No.1 Step-By-Step Guide: How to activate Paytm wallet | What is Paytm Postpaid | How to close Paytm Postpaid | How to Add Credit Card in Paytm Paytm
How to activate Paytm Wallet - A Step-by-Step Guide to Activating and Using Your Paytm Wallet
If you're new to Paytm, this comprehensive guide will walk you through the process of activating your Paytm wallet, allowing you to enjoy the convenience of quick and secure digital payments via credit or debit cards, UPI, or e-wallet. Paytm, a widely popular mobile wallet and payment gateway, not only facilitates swift money transfers but also offers a variety of rewards and discounts to its users. The activation of your Paytm wallet is a straightforward process that requires just a few simple steps.
How to Activate Your Paytm Wallet
The activation process for your Paytm wallet can be completed effortlessly by following these instructions:
1. Install the Paytm App:
Begin by downloading the Paytm app on your mobile device and signing in to your account.
2. Locate the 'Paytm Wallet' Option:
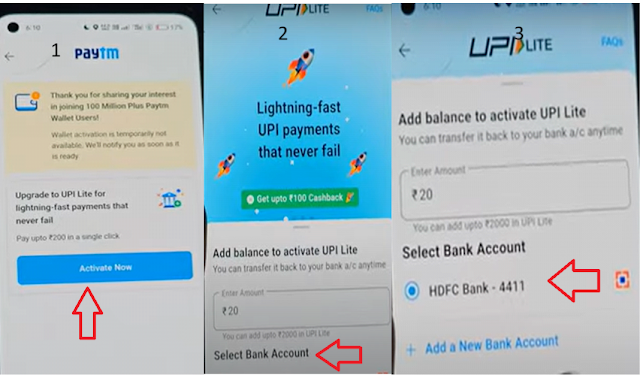
Once you're logged in, navigate to the 'Paytm Wallet' option within the app.
3. Provide Identification:
Just click on active now, and add your bank to activate your Paytm wallet.
4. Start Transacting:
With your wallet activated, you're now ready to use it for various transactions and payments as needed.
Activating Paytm Wallet Without KYC
To use your Paytm wallet, completing either a minimum KYC (Know Your Customer) or a full KYC is essential. The minimum KYC provides limited access to the wallet and necessitates the provision of specific information for activation. Meanwhile, full KYC unlocks all the wallet's features. Without completing at least the minimum KYC, you won't be able to activate your Paytm wallet.
Why Paytm Wallet is Not Working
If you encounter issues with your Paytm wallet, such as it not working for transactions, here are some common reasons and solutions:
1. Incomplete KYC:
Ensure that your KYC is complete before attempting any transactions using your Paytm wallet.
2. Beneficiary Details:
Double-check the accuracy of the details of any beneficiaries you add to your wallet to avoid transaction problems.
3. Sender and Receiver KYC:
Both the sender and receiver must have completed their KYC for transactions to succeed.
4. Adding Beneficiary:
To send an amount exceeding Rs. 10,000, the recipient must be added as a beneficiary in the Paytm app.
5. Upgrade Receiver's Account:
If the receiver hasn't completed their KYC, the sender can share a link via the Paytm app to help them upgrade their account.
6. Transaction Limits:
Be aware that the receiver may be unable to receive funds if they've reached their monthly transaction limit.
What is Paytm Postpaid
Paytm Postpaid is a revolutionary financial service offered by Paytm's NBFC partners, Aditya Birla Finance Limited and Fullerton India Credit Company Limited. In this article, we'll delve into the details of Paytm Postpaid, including its benefits, eligibility criteria, the application process, bill repayment, and additional charges. Whether you're new to Paytm Postpaid or looking to explore its features further, this guide has you covered.
Paytm Postpaid is a convenient Buy Now, Pay Later facility that allows users to make online and offline purchases across a vast network of 1 crore+ websites and merchants. Here are the key highlights:
- Line of Credit: Paytm Postpaid operates as a line of credit, providing users with on-demand loans.
- Credit Limit: Users can access instant credit of up to Rs. 60,000 with an interest-free period of up to 30 days.
- Usage: This credit can be utilized for various purposes, including making purchases, bill payments, recharges, and ticket bookings.
How to activate Paytm Postpaid
Users can activate Paytm Postpaid through a simple 2-minute onboarding process on the Paytm app.
Eligibility Criteria to Apply for Paytm Postpaid
Paytm Postpaid is accessible to all Paytm users, and it doesn't necessitate an existing credit score or proof of employment. However, approval is subject to fulfilling the NBFC partner's risk policy. Eligibility conditions include:
- Valid PAN Number: Users must possess a valid PAN number.
- Age: Applicants must be 20 years or older.
- KYC Verification: Completion of online KYC verification via CKYC or Aadhaar number is mandatory.
- Residency: Users must be Indian residents.
How to Activate Paytm Postpaid
Activating Paytm Postpaid is a straightforward process. Follow these steps:
1. Click on Postpaid Icon:
Access the Postpaid section on the Paytm app homepage.
2. Fill in Details:
Provide essential information, including your PAN number, date of birth, and email address. Consent to fetch your Credit Report by ticking the checkbox.
3. Offer Generation:
After giving the required details. You will be asked for an alternate mobile number for offer updates on your mobile.
4. Activate Postpaid:
Complete the KYC check by taking a selfie and performing Aadhaar verification with OTP. Confirm your details to activate Postpaid.
Paytm Postpaid Bill Repayment & Other Charges
Paytm Postpaid simplifies bill management with a consolidated monthly bill. Here are the details:
- Billing Cycle: The billing cycle spans one month, with bills generated on the 1st of the following month.
- Due Date: Repayments are due by the 7th of the month.
Repayment Options:
- Users can repay Postpaid spending at any time through UPI, Debit Card, or Net Banking.
- Late fees apply for overdue bills and may range from 0 to Rs. 750 plus GST.
- Users can make advance payments towards their outstanding balance at any time during the month.
How to Close Paytm Postpaid
Introduction:
In this article, we will learn how to deactivate Paytm Postpaid, but it's essential to follow the necessary steps to ensure a smooth closure. In this comprehensive guide, we will walk you through the steps required to deactivate your Paytm Postpaid account, along with important considerations before and after deactivation. Let's get started.
Step 1: Clear Outstanding Dues
The first step in deactivating your Paytm Postpaid account is to clear any outstanding dues. Here's how:
- Log in to your Paytm app.
- Repay the entire outstanding amount, if any, which can be found in the Paytm Postpaid section.
- Choose your preferred payment method, such as UPI, debit card, credit card, Paytm wallet, or other available options.
- If the amount is substantial, you can also opt to convert it to EMIs. However, ensure that you clear the total payable before proceeding with deactivation.
Step 2: Transfer Paytm Wallet Balance
If you have any funds remaining in your Paytm wallet, it's crucial to transfer them to your bank account before initiating the deactivation process. Once your account is deactivated, you won't have access to the wallet balance. Follow these steps to transfer the money:
- Navigate to the 'Payments Bank' tab in the Paytm app.
- Select 'Transfer to Bank.'
- Enter the amount you wish to transfer and provide your bank details.
- Your fund will be moved to your bank account.
Step 3: Raise Deactivation Request
After clearing dues and emptying your wallet, follow these steps to request the deactivation of your Paytm Postpaid account:
- Launch the Paytm App and navigate to your profile page.
- Tap on the 'Help & Support' option.
- Select '24x7 Chat Support' from the menu.
- Clearly explain your issue and intention to the support executive.
- Politely ask the support executive to deactivate your Paytm Postpaid account.
Upon completing these steps, a reference number will be generated for your deactivation request. Be sure to note this number for future reference.
Step 4: Wait for Account Deactivation
Paytm will verify that there are no pending payments or tasks associated with your account. Once confirmed, the executive will initiate the deactivation process and notify you via email. Typically, this process takes 1-2 working days after you raise the request. It's essential to wait for the confirmation before deleting the Paytm app to ensure a smooth closure.
Important Considerations After Deactivating Your Paytm Postpaid Account
Once your Paytm Postpaid account is deactivated, keep these key points in mind:
- You won't be able to log in or use your deactivated account. Your associated login ID and password will no longer work.
- Transaction logs are retained for ten years, as mandated by RBI guidelines for wallets. This information is only accessed if legally required.
- Notify ICICI Bank about the account closure to avoid any unnecessary correspondence.
- For financial flexibility, consider exploring alternative credit options, such as credit cards or other pay-later services.
A Hassle-Free Guide: How to Add Credit Card in Paytm Paytm
Introduction:
Paytm, one of India's leading digital payment platforms, offers users the convenience of adding both credit and debit cards for seamless transactions. Whether you hold a Visa, MasterCard, Rupay, Amex, or Diners Club card, Paytm ensures a smooth payment process. This article provides step-by-step instructions on how to add your credit/debit card to your Paytm account, making your transactions quick and hassle-free.
Steps to Add Credit/Debit Card to Paytm Account
1. Access Your Profile:
Open the Paytm mobile application and navigate to your profile section by clicking on your profile picture at the top left corner of the main screen.
2. UPI & Payment Settings:
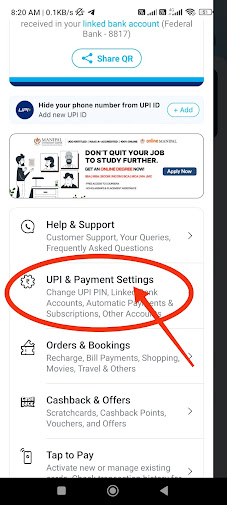
Scroll down the left sidebar that appears, you'll find various options. To include a credit/debit card in your Paytm account, select the 'UPI & Payment Settings' option.
3. Saved Cards:
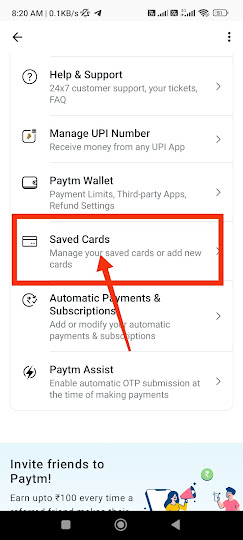
Once in UPI & Payment Settings, select the 'Saved Cards' option.
4. Add New Card:
On the following screen, you'll see a list of your previously added cards. Beneath these card details, locate the option to 'Add New Card' and click on it.
5. Authentication:
Paytm will notify you that Re. 1 will be deducted from your new card for authentication purposes. This step is essential to verify your card details. Please note that the debited Re. 1 will be refunded to your credit/debit card within the next 48 hours. Click 'Proceed' to continue.
6. Enter Card Details:
On the next screen, you'll be prompted to enter your card details. Be sure to check the option to 'Save this card for future payments for convenience.
7. Payment Confirmation:
Proceed by confirming the payment of Rs. 2 from your new credit/debit card.
8. Successful Addition:
Once the payment is processed, and your card details are verified, your new card will be successfully added to your Paytm account.
Saving your credit/debit cards within the Paytm app eliminates the need to manually enter card details, such as card numbers and expiration dates, every time you make a payment. It is highly recommended to save your card details for future transactions, ensuring quick and hassle-free payments.
It's important to note that the Paytm application employs robust encryption to secure your card details. Additionally, Paytm does not store your CVV number, and you will be prompted to enter it each time you make a payment on the Paytm app, adding an extra layer of security to your transactions.
How to Remove Credit Card From Paytm
Introduction:
Managing multiple credit cards can become overwhelming over time. When you find yourself with credit cards that you no longer use or need, it's wise to deactivate them. While the process of deactivating a credit card can vary from one bank to another, there are common steps you can follow to efficiently deactivate your credit card.
Step-by-Step Guide: How to remove credit card from Paytm
One of the simplest ways to deactivate your credit card is to contact your bank's customer service. Here's how:
1. Reach out to your bank's customer service representatives and request the deactivation of your credit card.
2. Bank agents will contact you to discuss the process further. They may inquire about the reason for canceling your credit card and request some details.
3. You can find the contact information for your bank's customer support on the official website.
Steps to Deactivate Credit Card via Post
To deactivate your credit card through traditional mail, follow these steps:
1. Write a letter containing all the necessary details about your credit card.
2. Mail the letter to the department responsible for credit card matters in your bank or credit card issuer via regular or registered post.
3. You can easily locate the postal address of your bank or credit card issuing company on their official website.
Steps to Deactivate Credit Card via Email
Deactivating your credit card via email is another option:
1. Send an email request to your bank or credit card issuer expressing your intention to deactivate your credit card.
2. Provide your credit card and personal details in the email and request deactivation.
3. Your request will be processed after the provided details are verified.
4. You can find the appropriate email address on the official website of your bank or credit card issuer.
Steps to Deactivate Credit Card via Website
Certain banks and credit card issuers offer the convenience of deactivating your credit card online through their official portal. Here's how:
1. Log in to the official website of your bank using your credentials.
2. Navigate to the 'Credit Card' section and select 'Deactivate.'
3. Fill out the deactivation form by entering the required details and click 'Submit.'
4. After submission, a bank representative will contact you for confirmation, and your request will be processed further.
Points to Consider While Deactivating Your Credit Card
Before proceeding with credit card deactivation, consider these important points:
- Ensure there is no outstanding balance in your credit card account.
- Familiarize yourself with your bank's credit card deactivation procedure.
- Utilize any remaining rewards and discount vouchers associated with your credit card.
- Cancel all auto-payments and bill transfers linked to your credit card.
- Review your credit card statement to confirm there are no last-minute charges.
- Verify the exact deactivation date with customer care representatives.
- Request a written confirmation from the credit card issuer once your card is deactivated and the account is closed.
- Note that when you deactivate a primary credit card, any associated add-on cards will also be deactivated.
- After initiating the deactivation request, you won't be able to transfer your balance from this card to another.
How to Cancel Movie Tickets on Paytm
Introduction:
Sometimes plans change, and you may need to cancel your movie tickets booked through the Paytm app. Thankfully, the process is straightforward and user-friendly. In this guide, we'll take you through the step-by-step process of canceling your movie tickets on the Paytm app.
Step 1: Open the Paytm Application
Begin by locating the Paytm app on your Android device. Look for the distinctive white logo with "Paytm" written on it. This logo serves as the trademark symbol for the Paytm application.
Step 2: Tap on Three Horizontal Lines
After launching the Paytm app, you'll find three horizontal lines at the top left corner of the main page. Simply tap on these parallel lines, and it will open a sidebar displaying various options, including "My Passbook," "My Orders," and more.
Step 3: Tap on "My Orders"
Among the options on the sidebar, locate and tap on "My Orders." This section allows you to view all your past orders made through the Paytm app.
Step 4: Tap on "Tickets"
Once you're on the "My Orders" page, you'll see multiple tabs, such as "Shopping," "Travel," "Tickets," and others. Choose the "Tickets" tab, and it will display all the movie tickets you've booked using the Paytm app.
Step 5: Tap on "Movie Tickets"
Under the "Tickets" tab, you'll find a list of your recent movie ticket orders made with Paytm. Tap on the specific booking that you wish to cancel.
Step 6: Tap on "Cancel Booking"
Now, you'll see the details of your ticket and the show. Ensure that you want to cancel this particular ticket, and then tap on the "Cancel Booking" option.
Step 7: Tap on "Cancel Ticket(s)"
A pop-up will appear, notifying you that after canceling, the amount will be refunded to your Paytm wallet. If you are certain about canceling the booking, tap on the "Cancel Ticket" option.
Step 8: Tap on "OK"
You'll receive another pop-up confirming that your ticket has been canceled, and the amount has been credited to your Paytm wallet. Simply tap on "OK" to confirm and proceed with the cancellation.
Pro Tip: Consider opting for Cancellation Protection, which provides a full refund of the ticket price if you need to cancel. You can also check your wallet balance to verify that the amount has been credited.
Conclusion:
Paytm offers a comprehensive suite of services, ranging from flexible financial solutions like Paytm Postpaid to secure payment options such as adding credit/debit cards to your Paytm account. With its user-friendly interfaces, Paytm has become a trusted choice for a wide array of needs. Whether you're seeking short-term credit, a convenient bill payment experience, or the ability to cancel movie tickets effortlessly, Paytm has you covered. Embrace its ease and convenience and take advantage of these services today to simplify your financial and payment-related tasks.
Read more about


Post a Comment